Workshop practice Part 4
Drills, and how to sharpen them
by Peter Wilson
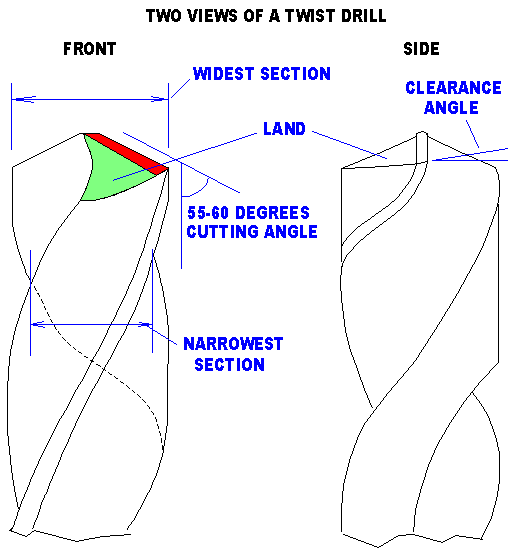
First an apology for the drawing. A twist drill is a very difficult thing to draw.
There is nothing better than a sharp drill and not much worse than a blunt one. I will try to show the basics of hand sharpening a twist drill up to about 3mm diameter and also how to make a good drill from a sewing needle. What you are trying to do is put two cutting faces at the top of the drill. They should be of equal length, with the main angle, the cutting angle, at fifty-seven degrees to the centre line. The exact angles are not as important as getting both the faces the same length. If you don't, the drill will not revolve around the centre of its axis and will drill oversize. From the cutting edge, the cutting face should have a clearance angle of a few degrees.
Also, bear in mind that good quality twist drills have a cutting edge down both sides. It is a common mistake to ignore this fact and not sharpen right up to these side faces. This will lead to metal which is not being cut properly getting hot, and the drill will then either chip and go blunt or worse still, it will over-heat and go blue (soft).
Tools A medium carborundum stone, an Arkansas stone (pronounced arkansaw), a pin vice, some 'three in one' type oil.
|
Method Grip the drill firmly in the pin vice. Ensure that the carborundum stone is on a firm bench with something under it to stop it slipping. Put a few drops of oil on the stone.
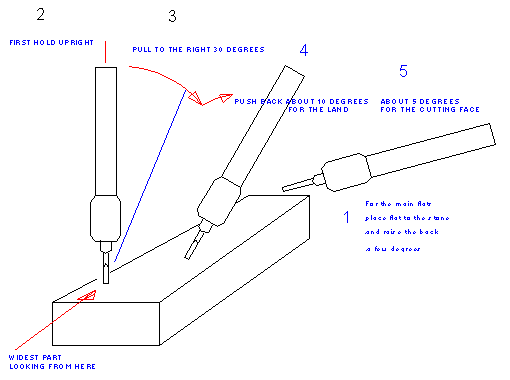
This is the way to line up the drill to get the correct angles. Place the stone on the bench, level with your left shoulder and angled towards north-east. (This job must be done with the right hand.) Place the drill on to the stone bolt upright. Look along the stone and slowly turn the drill until you are looking at the widest section, where it is in contact with the stone. If the drill has been broken, you will have to estimate where the widest part will be after sharpening. Next, keeping the drill in contact with the stone, pull the pin vice over to the right. About thirty degrees should do it. This should set the main angle of about fifty to sixty degrees. Now push the pin vice away from you a few degrees, say ten. This is to set the land (shown in green). Hold this position and, with firm but not brutal, downward pressure, move the drill back and forwards on the stone until you have ground the first face. This should extend halfway across the width of the drill. Turn the drill round and repeat the process. Try to maintain the main and clearance angles that you have set and make them equal. Now decrease that ten-degree angle to about five degrees and grind a little more for the clearance angle of the cutting faces (shown in red). There will be a very small flat at the top centre where the two cutting faces meet. The cutting faces should be about the same width as the side cutting faces. Typically, on a 3mm diameter drill, the side faces are about 0.75mm wide and so should the main faces. Before you remove the drill from the pin vice, test it by hand on a piece of scrap material. If you have sharpened it correctly, there will be two lovely curls of swarf spiralling up from the work. By the way, do not try to drill until you have made a centre punch mark to start the drill. If you are happy with the results, switch to the Arkansas stone and polish the cutting faces. |
|
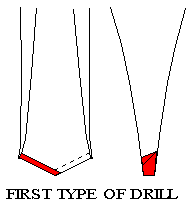
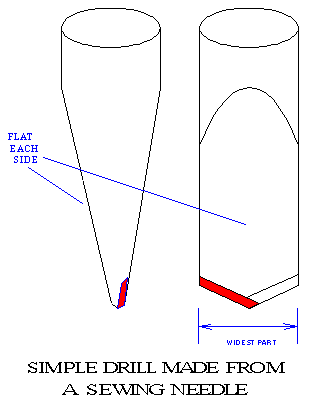
Making drillsNow I will show how to save some money and make a drill from a sewing needle. Don't try this above 1.5 mm diameter.The first drills were made by forging a pair of flats on some round stock and grinding to the desired shape. By the same token if you break the sharp end off a sewing needle, you can then grind two flats on the shank and sharpen as shown, following the general instructions for a twist drill. The steel used in needles is almost as good as high-speed steel. Drills made from needles do not have the side clearance and can not be run at the same speed, but with care and plenty of oil, you will be able to drill metal up to 1mm thick. The method is similar to sharpening a twist drill with a few exceptions. Place the needle shank in a pin vice and lay it flat on a fairly rough stone. If you have a 4-jaw chuck in the pin vice, use the jaws to line up the first side to be ground. Raise the back of the pin vice about ten degrees and put your index finger on top of the shank, so that you can apply the pressure to it through your finger and not through the pin vice (which will break it for sure). Move up and down the stone, trying to retain the same grinding angle. It does take some time to put these flats on, so have patience. When you are happy with the first flat, turn the shank round through 180 degrees using the pin vice jaws to line up the second flat. Alternatively, if you possess a medium diamond file, you can use that for the two flats. Now follow the instructions for sharpening a twist drill. Start by lining up on the stone with the widest part facing you and go from there. Good luck and happy modelling. |
|
© Peter Wilson
April 2000
| Return to top of page | Safety, privacy and cookies |