Workshop practice
Part 3 Scrawker
by Peter Wilson
A scrawker is a blade that will scribe a line in plastic or metal.
The profile of the line is a V, and the scrawker should not raise a burr on either side of the profile. The lines thus raised will either be decorative, planking for example, or to enable the material to be snapped in a straight line.
There are some commercially made versions of scrawkers in the market, one made by Tamiya, which I believe is part of a handle and blade set.
| What I am going to describe here is a very cheap and simple way of making a scrawker blade from a scalpel blade. I use a worn-out No 11 scalpel blade (for use in a No 3 handle) as a blank, but if you use different sizes it will not make much difference. See figure 1. | 
|
Method
|
You will need an electric grinder with a medium grindstone. You can either use a bench grinder or a stone held in the chuck of a hand held mini-drill.
Place a used scalpel blade into a scalpel handle, which should be a good fit. If it's sloppy and the blade can move about you can get hurt! For safety, take the sharp edge off by lightly grinding – see figure 2. |

|
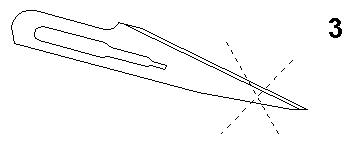
| Then shorten the end of the blade as shown by the dotted lines – see figure 3. |

|
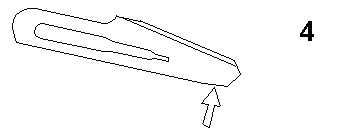
| Now, where indicated by the arrow in figure 4, grind the approximately right-angled indent into the back of the blade. | 
|
| The edge marked X should be at right angles to the blade and polished if possible. See figure 5.
The edge marked Y should now be honed to a V profile. This is the shape that the cut will make. You can experiment with the angles to find what suits you. The shapes needed may vary depending on whether you are scrawking to cut and break off some material, or to emboss lines such as planking. |

|
Use
Holding the handle in a normal 'pen' grip with the index finger on top to guide and apply pressure.
Use a steel rule to guide the cut, which is a stroke towards you. The first cut should be quite gentle and the line should be deepened with repeated light strokes rather than one heavy one.
Should the tool become blunt, sharpen it by honing the face marked X. Or make another one.
Good luck and happy modelling.
© Peter Wilson
September 2003
| Return to top of page | Safety, privacy and cookies |